友情提示:本文最后更新于 144 天前,文中的内容可能已有所发展或发生改变。
Deno
https://dash.deno.com/tutorial/tutorial-http
new一个playground
const UPSTREAM_HOST = "baozongwi.github.io";
const MY_DOMAIN = "baozongwi.xyz";

Deno.serve(async (request) => {
  const url = new URL(request.url);

  url.hostname = UPSTREAM_HOST;
  url.protocol = "https:";
  url.port = "443";

  const newHeaders = new Headers(request.headers);
  newHeaders.set("Host", MY_DOMAIN);

  newHeaders.set("Referer", `https://${MY_DOMAIN}`);

  const newRequest = new Request(url, {
    method: request.method,
    headers: newHeaders,
    body: request.body,
    redirect: "manual",
  });

  const response = await fetch(newRequest);
  return new Response(response.body, {
    status: response.status,
    statusText: response.statusText,
    headers: response.headers,
  });
});
由于我是腾讯云的域名做了一个CNAME到博客,所以解析也需要修改,现在项目的settings打开,添加域名,然后照着加解析即可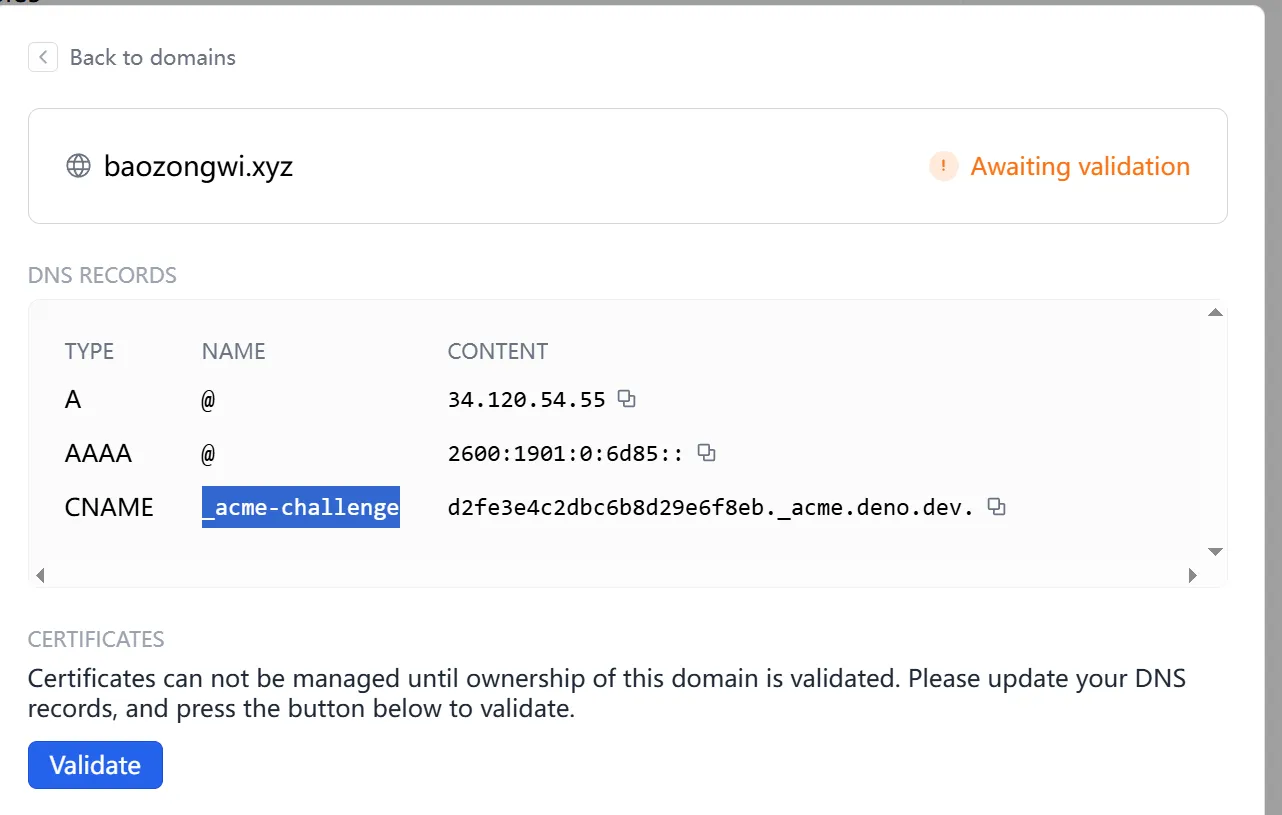
接着申请证书,成功部署就会发现
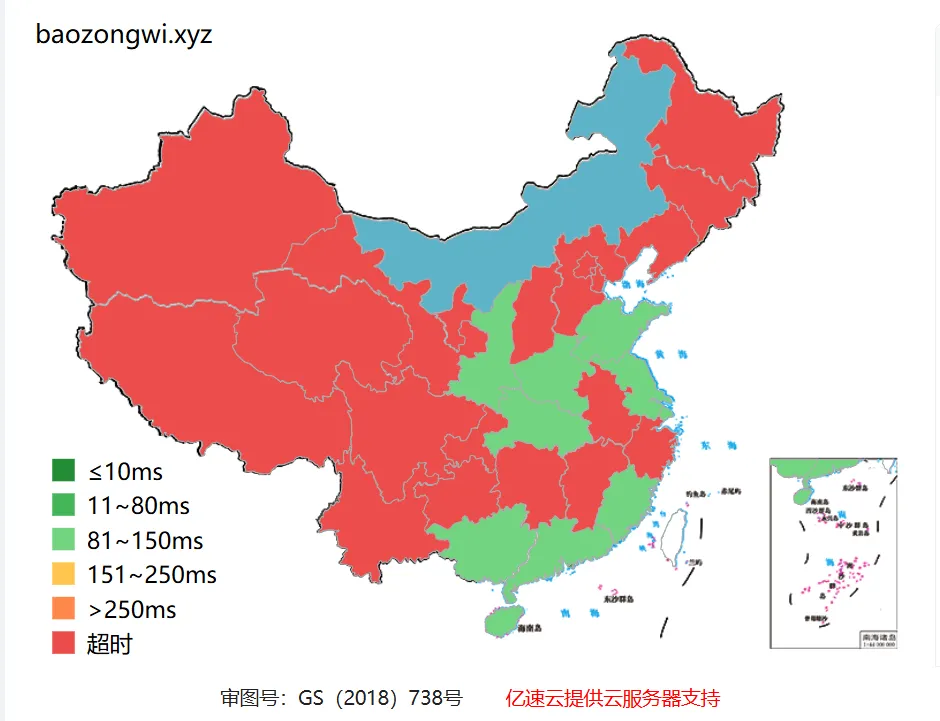
还不如以前了,nnd
CN2 HK
后来打算用国内的CDN的,因为CF太慢了,所以我是不可能用的,但是我发现个事情,我不是服务器多吗,那我可以直接走这个的流量啊,CN2的线路也很合适,做一个反代就可以了,我使用的是 apache2
a2enmod proxy proxy_http ssl headers
systemctl reload  apache2
修改域名的解析,不用CNAME了,直接 A 类型解析到服务器,然后写入配置文件nano /etc/apache2/sites-available/baozongwi.xyz.conf
<VirtualHost *:80>
    ServerName baozongwi.xyz
    ServerAlias www.baozongwi.xyz

    DocumentRoot /var/www/html/baozongwi.xyz

    ErrorLog ${APACHE_LOG_DIR}/baozongwi_error.log
    CustomLog ${APACHE_LOG_DIR}/baozongwi_access.log combined
</VirtualHost>
再启用这个配置
a2ensite baozongwi.xyz.conf
systemctl reload apache2
申请 https
certbot --apache -d baozongwi.xyz
现在来配置反代
# nano /etc/apache2/sites-available/baozongwi.xyz-le-ssl.conf
<IfModule mod_ssl.c>
<VirtualHost *:443>
    ServerName baozongwi.xyz
    DocumentRoot /var/www/html

    ErrorLog ${APACHE_LOG_DIR}/baozongwi_error.log
    CustomLog ${APACHE_LOG_DIR}/baozongwi_access.log combined

    SSLCertificateFile /etc/letsencrypt/live/baozongwi.xyz/fullchain.pem
    SSLCertificateKeyFile /etc/letsencrypt/live/baozongwi.xyz/privkey.pem
    Include /etc/letsencrypt/options-ssl-apache.conf

    SSLProxyEngine on
    SSLProxyVerify none
    SSLProxyCheckPeerCN off
    SSLProxyCheckPeerName off
    ProxyPreserveHost On
    ProxyPass / https://baozongwi.github.io/
    ProxyPassReverse / https://baozongwi.github.io/
</VirtualHost>
</IfModule>
重启
apachectl configtest
# 如果显示 Syntax OK,就重启
systemctl restart apache2
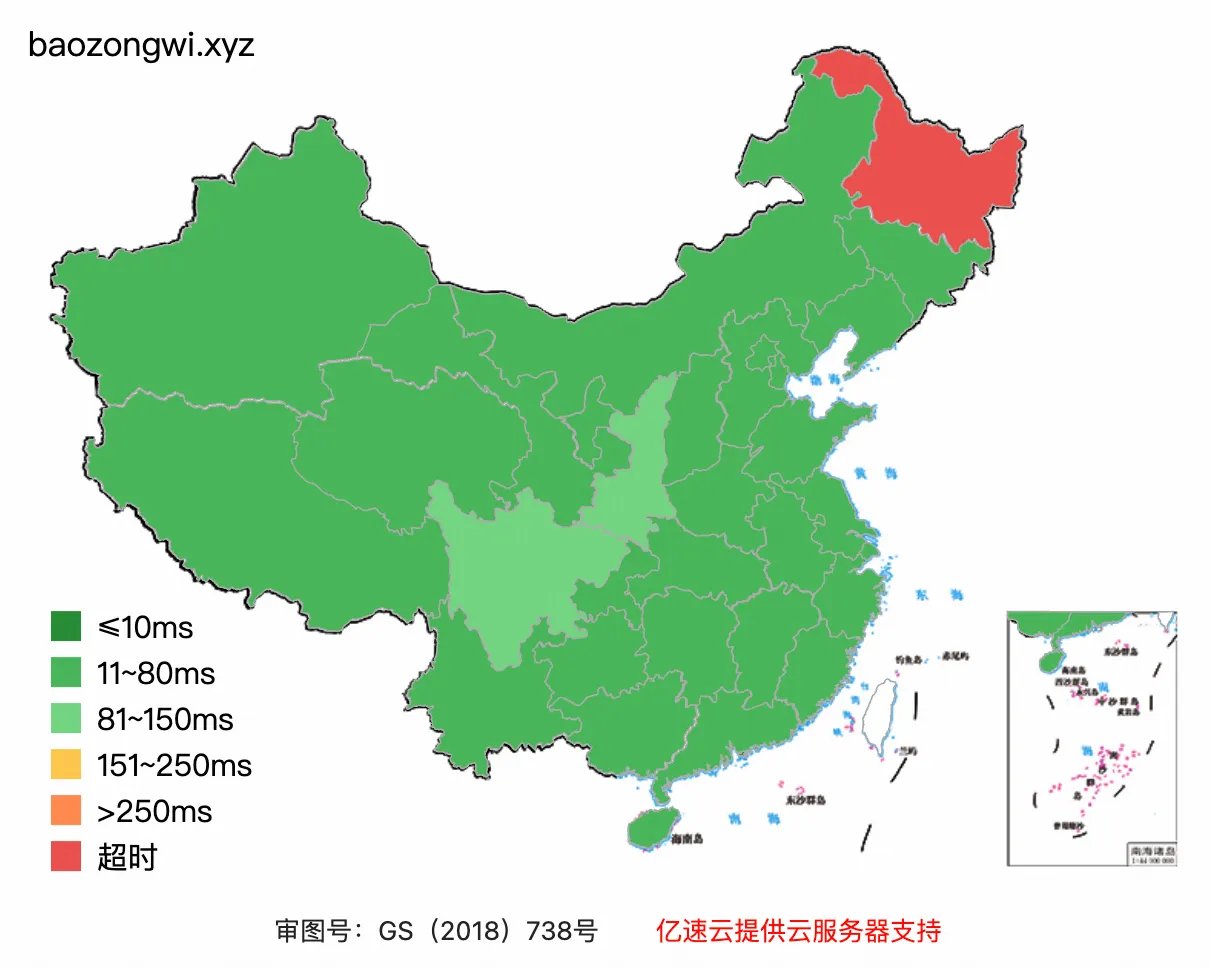
最后网站速度如上,简直无敌
闲来无事,apache + certbot 显然没有 caddy 更方便,这个服务我之前也早有耳闻,但是从来没实践过,我自己的博客已经取消了反代,现在给 su-team.cn 配置
直接修改vim /etc/caddy/Caddyfile
su-team.cn {
    reverse_proxy https://team-su.github.io {
        header_up Host {upstream_hostport}
    }
}
改好之后一般都是格式不对的,用 caddy 自带的修复命令重写下,然后重启等等,命令如下
sudo caddy fmt --overwrite /etc/caddy/Caddyfile
sudo caddy validate --config /etc/caddy/Caddyfile
sudo systemctl restart caddy
sudo systemctl status caddy --no-pager -l